Web Chat (Agents)
Web Chat is your embeddable website widget: visitors see a branded home screen, optional dashboard widgets, and a full messaging experience tied to the same AI agent you configure under General, AI Settings, and Knowledge Base.
This guide walks through the Appearance workspace—Home Page and Agent Settings—so you can match your brand, tune the launcher bubble, and connect forms without guessing which tab does what.
Turn Web Chat on for this agent under Integrations and open Configure if your workspace requires it. Then use the steps below from Agents → your agent → Web Chat.
Where everything lives
Use the left sidebar under SPOTLIGHT to open Web Chat. The main area splits into:
| Area | Purpose |
|---|---|
| Center | Live preview of the widget (mobile-style frame). |
| Top tabs | Appearance (look, copy, widgets, bubble, forms) and Deploy (embedding and go-live). |
| Right panel | Home Page vs Agent Settings, each with their own sub-tabs. |
Appearance breaks down like this:
- Home Page
- General — Welcome screen, logo, colors, headline, chat launcher.
- Dashboard Widgets — Optional cards and modules on the home tab.
- Agent Settings
- General — Chat header name, font, bot icon, first message, placeholder, starter questions.
- Bubble — Floating launcher icon, corner position, popup teaser.
- Forms — Lead collection and link to Workspaces → Forms.
Use Deploy (top tab) when you are ready to embed the widget, copy a shareable link, or try the agent in a browser before you ship to production.
Open Web Chat
- Sign in to ChatMaven and open Agents in the top navigation.
- Select your agent from the dropdown at the top of the left sidebar.
- Under SPOTLIGHT, click Web Chat.
- Open the Appearance tab to customize the widget; open Deploy when you want the embed code, direct link, or Preview to test the AI agent.
The in-app route matches live.chatmaven.ai/agent/webchat when you are signed in with that agent selected.
Home Page → General
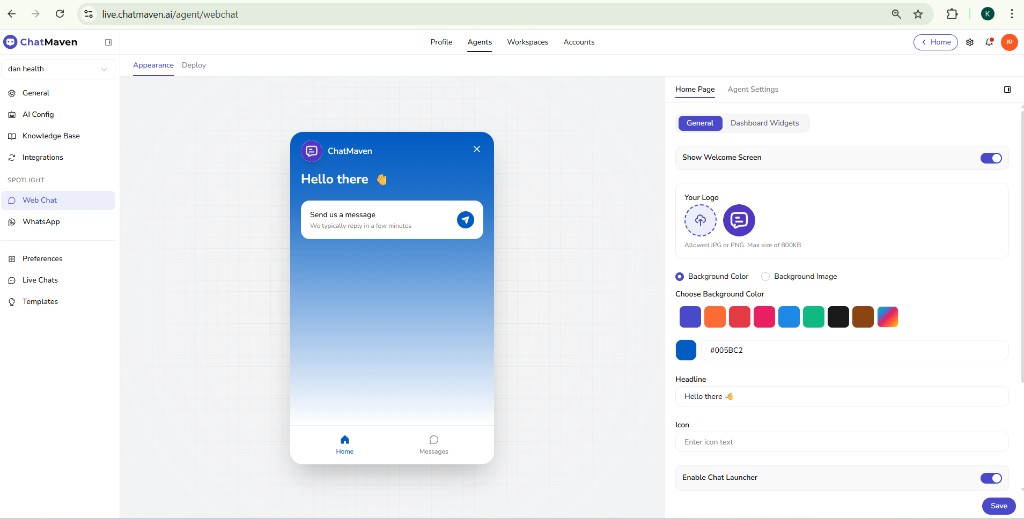
Home Page → General controls the first screen visitors see before or beside chat: welcome state, header, colors, and whether the chat launcher is visible.
| Control | What it does |
|---|---|
| Show Welcome Screen | When on, visitors see your configured home layout in the preview (greeting, prompt to message you, and bottom navigation such as Home and Messages). |
| Your Logo | Upload branding for the widget header. |
| Background | Choose Background Color or Background Image; preset swatches and hex (for example #005BC2) keep the header on-brand. |
| Headline | Main greeting text (for example “Hello there 👋”). |
| Icon | Short label or icon text shown in the header area when you use that field. |
| Enable Chat Launcher | Shows the entry point so visitors can start a conversation from the home view. |
Click Save when you finish this section so the preview stays in sync with production behavior.
Home Page → Dashboard Widgets
Dashboard Widgets let you enrich the Home tab with cards, links, or modules your team adds from this screen—think quick links, highlights, or self-serve content blocks that sit alongside Messages.

- Stay on Appearance and select Home Page in the right panel.
- Open the Dashboard Widgets sub-tab.
- Click + Add Widget and follow the in-app flow to create your first widget.
Add one widget, save, and check the center preview. You can iterate layout and copy without affecting Agent Settings until you are happy with the home experience.
Agent Settings → General
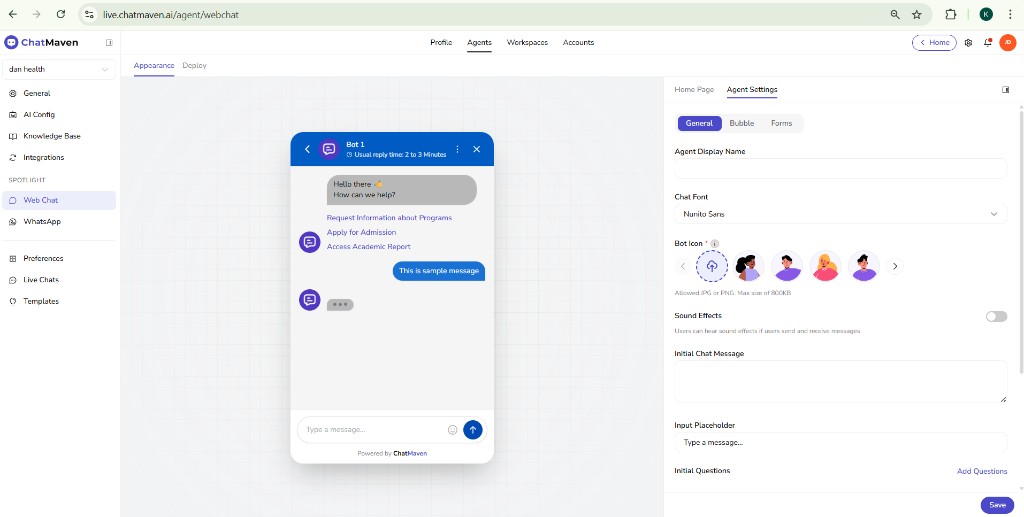
Agent Settings → General defines the conversation UI: how the bot is named, which avatar appears, the first message, placeholder text, and optional starter questions.
| Control | What it does |
|---|---|
| Agent Display Name | Title shown in the chat header (for example “Bot 1” or your support team name). |
| Chat Font | Typography for the widget (for example Nunito Sans). |
| Bot Icon | Upload a custom icon or pick from illustrated presets. |
| Sound Effects | Toggle UI sounds for send/receive where supported. |
| Initial Chat Message | First bubble from the assistant—set tone and context here. |
| Input Placeholder | Hint inside the composer (for example “Type a message…”). |
| Initial Questions | Use Add Questions to surface tappable shortcuts under the welcome message. |
Save after changes so the preview reflects the live chat thread.
Agent Settings → Bubble
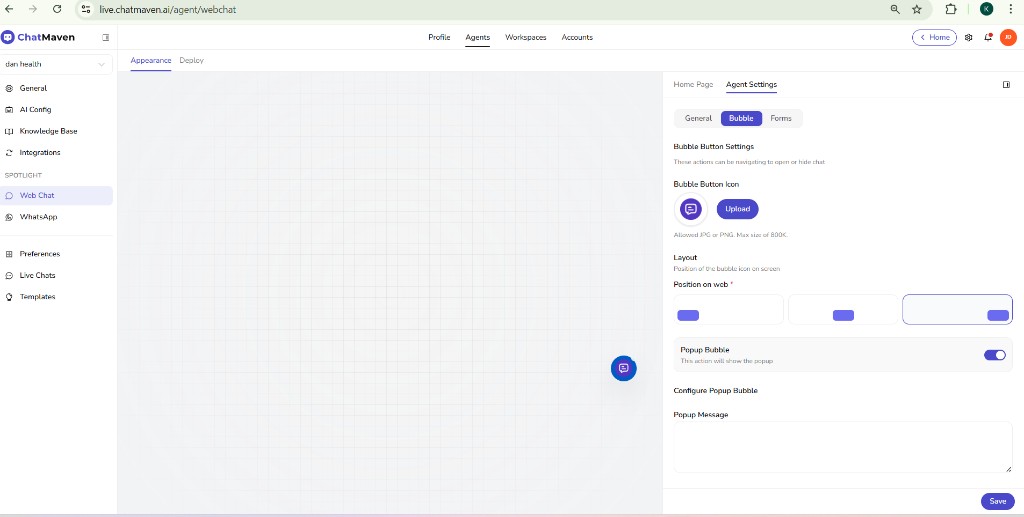
Bubble is the floating launcher on your website: icon, corner position, and optional popup teaser before the widget opens.
| Control | What it does |
|---|---|
| Bubble Button Icon | Custom JPG/PNG (max 800 KB per on-screen guidance). |
| Position on web | Bottom-left, bottom-center, or bottom-right. |
| Popup Bubble | When on, a small message can appear near the bubble to invite clicks. |
| Popup Message | Copy for that teaser (keep it short and action-oriented). |
Agent Settings → Forms
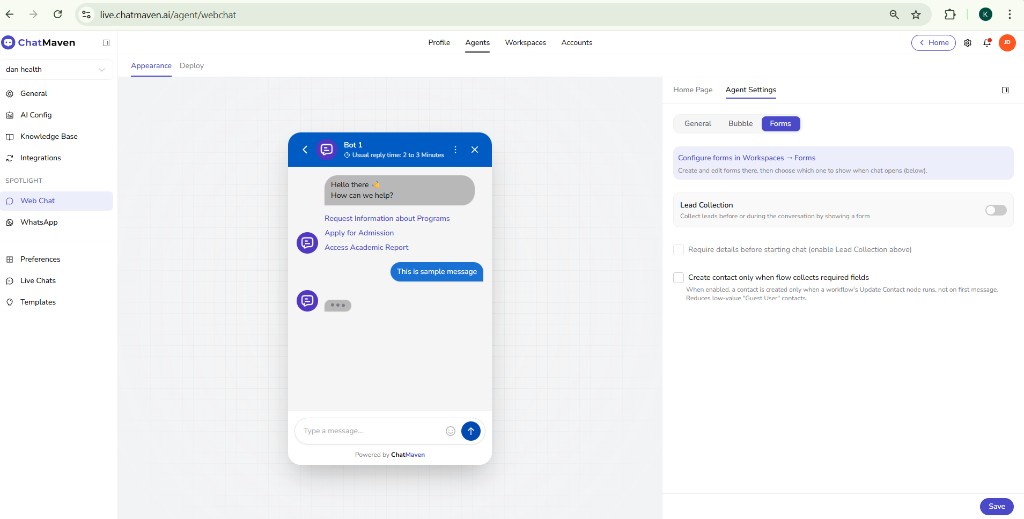
Forms connects lead capture to flows you maintain in Workspaces → Forms. You choose whether visitors must submit details before chat and how contacts are created.
- Create or edit forms under Workspaces → Forms in ChatMaven.
- Return to Web Chat → Appearance → Agent Settings → Forms.
- Enable Lead Collection when you want a form gate or data capture tied to chat open.
- Review the checkboxes for required details before starting chat and create contact only when required fields are collected—they control friction vs. data quality.
If you require details before chat, make sure your privacy notice and consent copy match what you collect on the form.
Deploy: embed Web Chat and test your agent
The Deploy tab is titled Deploy, with the subtitle: Embed your web chat widget into your website or share it via a direct link. Use it to go live on a site and to validate that your AI agent (knowledge, tone, and tools) behaves the way you expect.
- Open Agents, select the agent, then under SPOTLIGHT choose Web Chat.
- Click the Deploy tab at the top (next to Appearance).
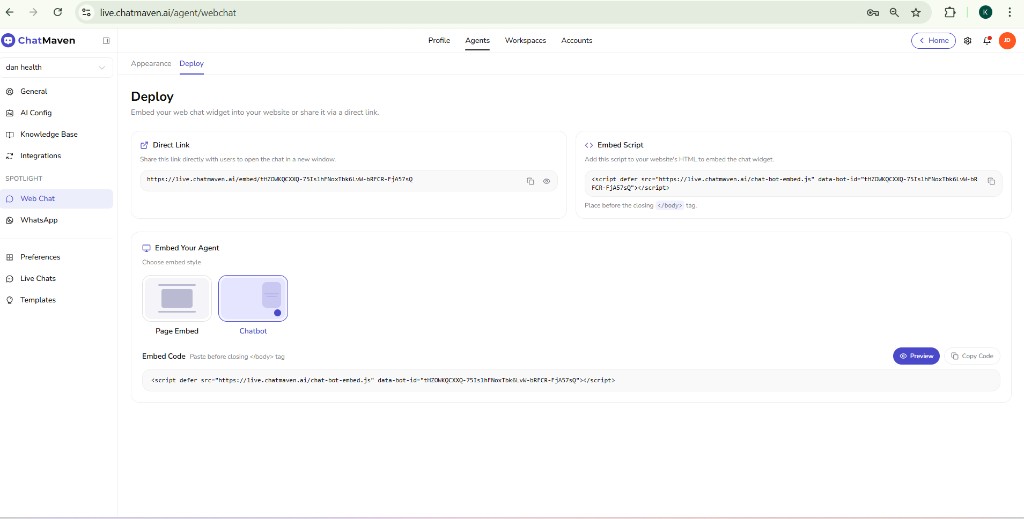
Direct link (quickest way to test)
Direct link gives you a URL you can open or share so the chat loads in a new browser window—no website or HTML changes required.
- Use Copy to grab the link, or the preview (eye) icon to open it in a new tab.
- Send a few messages and confirm answers match your AI Settings and Knowledge Base. This is the fastest loop for testing the agent before you embed anything.
Embed script
Embed script is the standard snippet for your own site.
- Instruction in the app: place the script just before the closing
</body>tag of your page. - The shape of the snippet is:
<script defer src="https://live.chatmaven.ai/chat-bot-embed.js" data-bot-id="YOUR_BOT_ID"></script>
Always use the exact line from your Deploy tab—data-bot-id is unique per agent. Use the Copy control in the app so you do not mistype the ID.
Embed your agent (Page embed vs Chatbot)
Under Embed your agent, choose how the experience should sit on the page:
| Style | Typical use |
|---|---|
| Page embed | Chat occupies a section of a page (for example a dedicated support or “Talk to us” block). |
| Chatbot | Floating widget (launcher bubble), usual for full-site coverage. |
The page shows the matching embed code and reminds you to paste it before </body>. Use Preview to try the selected style in the browser, and Copy code to copy the snippet.
After you deploy
- New visitor chats from Web Chat show up in Inbox with the Web Chat channel—use that to double-check real conversations.
- For general embedding patterns (multiple sites, apps, or policies), see Chatbot embedding.
Appearance vs Deploy (summary)
- Appearance — Home screen, widgets, chat chrome, bubble, and forms (everything above in this guide, before Deploy).
- Deploy — Direct link, embed script, embed style (Page embed / Chatbot), Preview, and Copy code for go-live and testing.
Quick checklist before go-live
- Home Page — Logo, colors, headline, and welcome screen match your brand.
- Dashboard Widgets — Added if you want a richer home tab.
- Agent Settings → General — Display name, initial message, and questions read well on a real phone width.
- Bubble — Position does not cover critical site CTAs; popup text is helpful, not noisy.
- Forms — Lead flow tested end-to-end if enabled.
- Deploy — Tested via Direct link or Preview; then embed script installed on the correct site and checked in an incognito or private window.
Related topics
- Integrations — Enable and configure Web Chat for the agent.
- Chatbot appearance — Broader widget and branding patterns for chat experiences.
- Chatbot embedding — How embedding fits into your site or app.
- Creating an AI agent — Full wizard including integrations and knowledge.
FAQ and troubleshooting
Web chat loads but sessions do not start.
Look for domain allowlist issues, ad blockers, and console errors. Confirm the agent is published and linked to this embed.
Can I pass the logged-in user’s name or email?
Use documented JavaScript or URL parameters to set visitor traits when your site already knows the user.
Multiple agents on one site.
Use different embed codes or routing rules so each page or brand line maps to the correct agent.